I welcome you back to my DevOps blog series!
In my previous blog post, we delved into the intricate world of Kubernetes Architecture, understanding its components, and how it revolutionizes container orchestration.
In today's blog, we embark on a practical journey, initiating Kubernetes with the help of Minikube, a fantastic tool for setting up a local Kubernetes cluster. By the end of this blog, we will have our own Kubernetes cluster up and running, with Nginx serving as our sample application.
You can check my previous blog here: "Kubernetes Architecture"
What is Minikube?
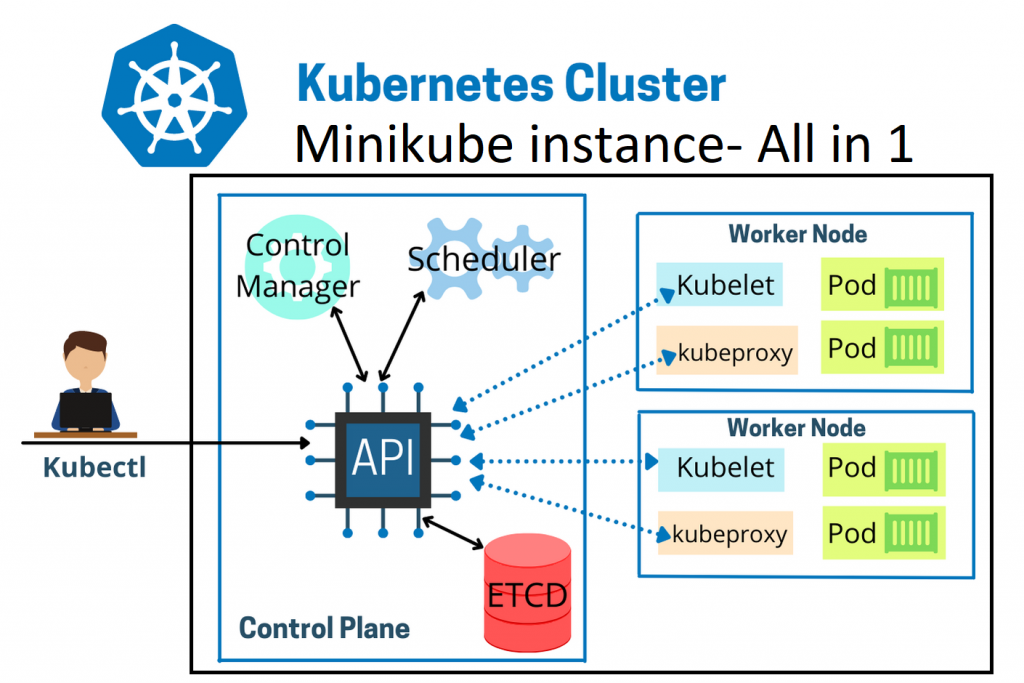
Minikube is like a mini version of Kubernetes, designed to work right on our computer. It sets up a virtual space where it creates a tiny cluster with just one node. This is super handy for developers and DevOps experts because it lets them practice, build, and test applications on Kubernetes without having to set up a big complicated cluster. It's like having a small, manageable playground to explore the powerful world of Kubernetes right from your laptop!

Features of Minikube
Easy Installation: Minikube is super easy to install. With just one simple command, even beginners can get it up and running.
Local Development: Minikube creates a safe space on your computer where you can test your apps. It's like a virtual sandbox that lets you try things out before putting your apps on a real server.
Support for Add-ons: Minikube comes with extras like Dashboard, Ingress, and Heapster. These add-ons make working with Kubernetes even better, giving you more tools to play with.
Multi-Node Clusters: You can use Minikube to make pretend clusters on your computer with multiple nodes. It's like practicing in a setup that looks and acts like a real big-scale system.
Cross-platform Compatibility: Minikube works smoothly on different kinds of computers - whether you're using Windows, macOS, or Linux. It ensures that no matter what computer you have, Minikube will work just fine.
Task 01: Install Minikube on your local
For a detailed installation guide, check out this GitHub Repository Document for Minikube Installation.
For an alternative guide check the Official Minikube Installation Guide.
If we use the AWS EC2 instance, I would suggest using t2.medium to launch minikube-server and follow the above steps from minikube installation guide for Ubuntu.

Pods
Pod is the smallest deployable unit, representing a single instance of a running process in a cluster.
Pods can contain one or multiple containers, tightly coupled and sharing the same network namespace, allowing them to communicate with each other using localhost.
A Pod (as in a pod of whales or pea pod) is a group of one or more containers. These containers share storage and network resources and have specific instructions on how to run. Everything inside a Pod operates in sync - they're placed and scheduled together, running in a shared environment.
Essentially, a Pod acts like a virtual home for one or more application containers, keeping them closely connected and working smoothly.
Task 02: Create your first pod on Kubernetes through Minikube.
To begin with Kubernetes using Minikube, follow these steps to create your initial pod
Install Minikube: This tool allows you to set up a single-node Kubernetes cluster right on your computer. Follow Task 01 from above.
Launch Minikube: Begin Minikube by opening your terminal and executing this command:
minikube startCreate a Pod Configuration File: Create a YAML configuration file outlining your pod specifications. For instance, create a file named pod.yaml with the following content:
   apiVersion: v1
   kind: Pod
   metadata:
     name: my-pod
   spec:
     containers:
     - name: my-container
       image: nginx
In this example, the configuration creates a pod named pod.yaml, with a container that runs the nginx image.
- Apply the Configuration: Apply the pod configuration using the following command:
kubectl apply -f pod.yaml
Check the Pod: Confirm the pod's status by running the following command:
kubectl get podsYou should see the
nginxpod listed with a status of "Running."
That's all there is to it! We've successfully created your initial pod on Kubernetes using Minikube. This example guides you through the fundamental steps of configuring a pod, implementing it, and accessing the newly created pod.
Conclusion
Understanding Minikube and Pods is fundamental to mastering Kubernetes. With this knowledge, you can further explore advanced topics like Deployments, Services, and StatefulSets, enabling you to deploy complex applications with ease.
I hope this blog has been informative and has sparked your interest in Kubernetes. If you have any questions or need further assistance, feel free to connect with me on LinkedIn. Let's continue this journey of learning and growing together in the vast landscape of DevOps and Kubernetes.


